Thursday, 28 September 2017

Brass and Metal Work

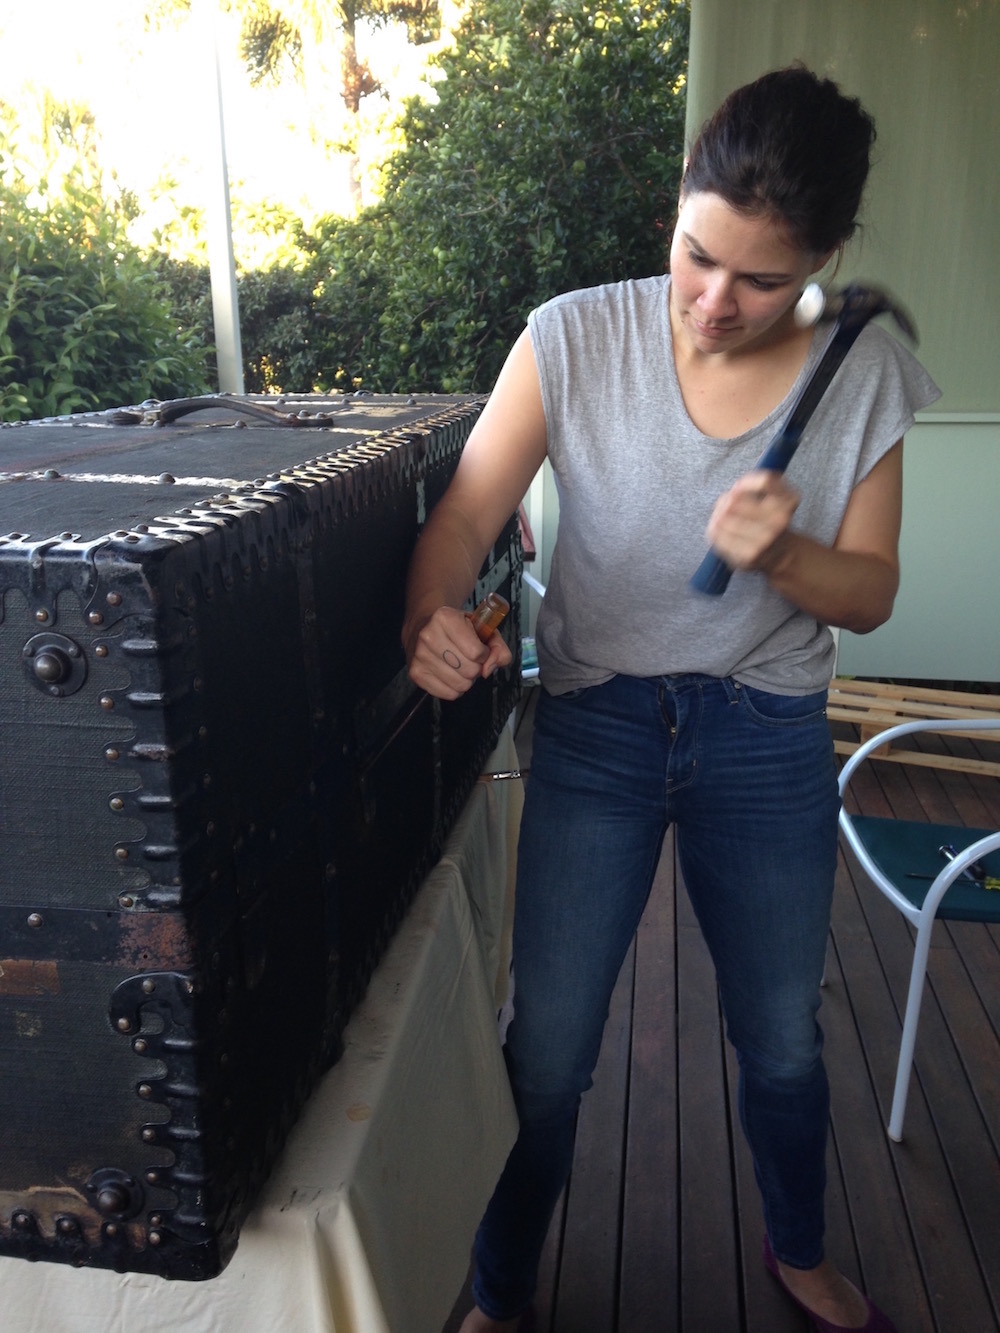
I started to clean the metal work with a good rub over using steel wool. 
A major problem occurred...When going around the scolloped edges the steel wool was leaving rub marks on the newly finished canvas (Damn Blast) Thinking caps on again.

First up, I taped out one end section as a sample, this little section was ok to do. 
It was quicker to clean, but there was yet another concern. Seriously.... the thought of taping this process to all the metal, which is double edged, I am talking 8 long sides and 16 short. 

Taped out section

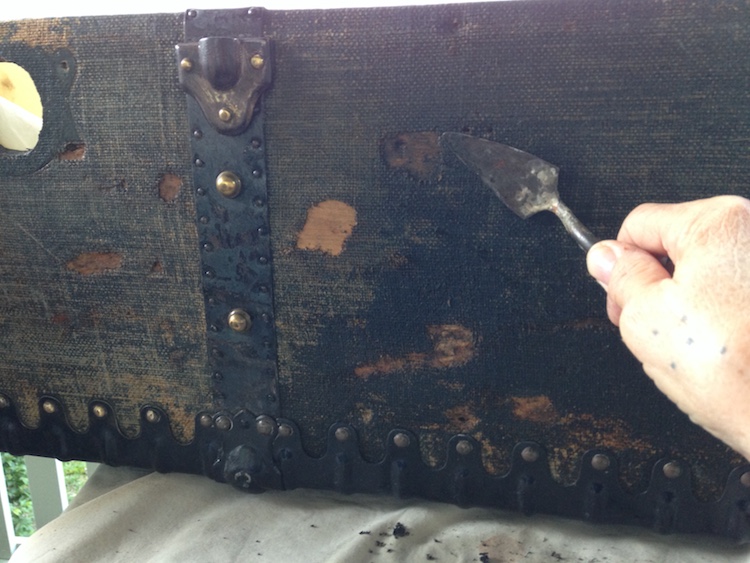
I ended up using the two scrapers below as a barrier between the canvas and the steel wool. I worked with one hand holding the scraper and the other using the steel
wool. A long process to do, but I got there in the end.


With the straight end of this scraper being wider and once I got a rhythm going.


The straight end of this scraper fitted into the scollop shape and I used it when I needed


After cleaning the metal, I gave thought to how I was going to set the task of re-painting the metal edging. I am so glad my wardrobe steamer trunk has got this lovely scalloped edge, but this painting process needs to have some thought put to it.

 I simply try it free hand. Having the thin edge of the metal a little it bit away from the canvas and again using these two scrapers above helped to keep the paint away from the canvas.

 As for the brass nail heads I started ok, but yeah! there were a few oops! and the need for quick wipe off with a cotton bud, again a very long process ahead. 

While on the subject of scrapers, pictured below are the group of scrapers I used for all the different areas of work needed on the trunk. The plastic ones were used to smooth out the material of the lining.                    


Variety of scrapers used throughout the trunk


Now for the cleaning of the brass nail heads. To avoid continual rubbing on both the new canvas and paint work I ended up making a little template with different size holes to accommodate the three different size brass heads throughout the trunk 
(well I actually made several because they wore out)

The plate fitted fitted over the nail heads and gave a barrier of protection needed. All brass nail heads were cleaned with steel wool, followed by a thin coating of Brasso, the buffed it all over with a micro fibre cloth. This process worked very well. 


Cleaning brass with a protective template


Hub's had an old set of 'needle files' which were the best ever little toolset have as they helped me do many things on the trunk. I could to clean into any tight corners, scrape the paint off the base of the nail heads where needed and clean in and under the handle of the brass connectors and any other pokey little hard to reach places.

Also, I found them useful for re-align parts that needed to re-join with the holes from outside the trunk, and to poke through the newly lined material of the trunk. 

Set of Needle Files

Cleaning out the base of a large nail head


Cleaning away excess paint 


Cleaning around the brass handle connectors


helping to re-line holes


An overview of the brass and metal problems that occurred: 

I um'ed and ah'ed whether it was best to do the paint first, or, clean the brass. To be quite frank, I really think it's six of one and a half a dozen of the other. Painting first, the brass heads often ended up with paint at the base, then cleaned with the needle files (this process was time consuming) and to be frank I never got all of it !!

But then, with the process of cleaning the brass after. While my little template worked so well, it was still very time consuming..But then I guess it would have to be with a scolloped edge like this!

 I am going to have to re-think if I can come up with any other ideas that might help improve this process for side two of the trunk.


Sunday, 24 September 2017

Cleaning The Trunks Canvas and Leather Handles

After the internal work was competed I decided to leave the re-lining until later. Although it was Winter when I started working on the trunk, living in the sub-tropics the weather is very mild with sunny days, - this year particularly, there have only been a certain number of cold nights. 

Although the trunks canvas has been neglected for so long, I felt the trunk in general was drying out even more from being outside on the deck, because of this I felt that the canvas needed to be done. I put up a shade barrier on a section of the deck which did help, then started planning the cleaning process.

I started by sponging down sections with warm water and a mild detergent. I noticed the canvas was feeling very sticky which bothered me greatly. Confession time has come. Years, and I mean years ago! I felt the canvas need help and in those days, there wasn't information available like there is today with the internet. 

So, I did a little test with shoe polish, this did seem to make an improvement. I ended up coating the trunk with a thin layer of the polish and this definitely helped the overall feel of the trunk. So here I am now in 2017 doing this clean, I really didn't think there would be any impact from the polish after all these years, but looks like there is.

Hmm!  Ok I thought, come on deal with this somehow. I ended up dampening the trunk more than a light sponge and did a few scrape tests in different areas and yes, this did lift the residue. So, off I went cleaning and scraping my way around the trunk. I was very gentle in doing so noticing weaker areas, while others could take a bit firmer scrape. 

I planned on cleaning the whole trunk down first, but after a couple of days of working on it, again concerns of drying out hit another level because it was also drying from the clean. I had to stop and completely change direction. 


Scraping process. Quite a lot of worn areas in this part of the trunk.
The canvas is worn but not rotted, some people would remove all the canvas,
but not me, that's how it is that's how it will stay.
I love the trunks scars, this is it's history and I often wonder
while working on it just how did it get the scars!
I worked around the trunk in sections, staining one then scraping the next.
After two were stained I then shellacked both.
The shellac highlights the timber as well,
 but shellacking has not been done at the stage of this photo


I mentioned earlier that I have left scars on my trunk and that's part of its journey. 
A picture below shows one of my scars. When I needed to re glue any canvas back down the trunk I used a water based glue, which was fine for this process. However, when the areas were completely dry, darker marks showed up around the edgings. 

I did manage to scrape some of it back before shellacking and there was an improvement, while not perfect. The second scar I left on my trunk were from splitting the canvas to be able to get in and re-glue. once dry the spits left a mark because the canvas shrunk away a little. 

Oh well, as with Ned Kelly's famous saying "Such Is Life"!


Splits in canvas re-glued and tapped


I had always planned on adding a dye to the canvas so now the time had come. I covered the already cleaned and stripped sections with two coats of dye, it gobbled the dye up so fast, it was SO dry. 

 Next, I gave it two coats of shellac, with a light sand with wet and dry, I wiped it over with a light damp cloth to remove any fine dustings, then another two coats, four in total.

The trunk felt and looked great, it was like a new lease of life had been put into it. 
I was really pleased, so much so that I gave it a little hug! 


Base all complete, the scaring from splitting the canvas can be seen in this shot...
Ah well, its another part of the trunks journey!


Years ago, while not rusted, the castors above did freeze up. It took some time working them loose, but we managed it. When I got to the base of the trunk I was amazed to see that they were still rolling.

An extra spray was given. I originally used WD40, but heard that Lanolin based spray worked better on in certain situations, so I decided to try it. They are now good to go for more years to come.


I thought I would just take this moment to add this photo of the near completed external section.
To avoid getting lost in the progress of the shellacking process I left ticked indicators as to whether one of two or two were coated. It is easy to get confused as to where I was with so many sections, not only that, in the end I coated the trunk with four layers of shellac so the tick process definitely helped 


I was determined to try and keep the original three leather handles my trunk. The handle on the side did have the leather separating in a few layers, managed to re-glue them together. 

This process probably isn't the right way of going about it, but I did it anyway. The same process was done for the handle on the top. From memory, the third handle (on the other section) should be much the same, this one will be viewed later when I get to it.


Handle before


Handle re-glued and strapped

Handle completed and saved


Monday, 18 September 2017


Removal of The Trunk Lining

After the trunk was divided the drawer compartment section was put aside and the hanging section was worked on. Again, the dirty cocky stained lining was removed. 

At first glance I thought I could possibly use the original padding from the back, like I did with the tie down straps. Staining could not be seen on the textured material  but in the end, I did decide to remove it, after all, cocky dirt would have been embedded into it for sure. New wadding will be replaced later.


Removal of the material lining


Once the lining was out I started to remove the paper lining. In doing this an interesting discovery was made. I noticed that there were two long splits going lengthways through the centre of the trunks side. 

Hmmm, perhaps this could be the reason as to why the front edge is out of alignment and not pulling back in. This will no doubt be revealed later when the trunk is re-joined. In the meantime, work needs to be done on this problem, so, thinking caps go on again!


Removal of the paper lining


Base split revealed

I filled the splits with timber glue then wedged the side up to take the strain off the splits. Pulling the trunk together until glue was coming out from the joint. 

A light wipe over with a rag, then the two splits were tapped and left to dry. Once dry, the tape was removed and the process seemed to have been successful. 

This area also appeared to be in need of being weighted downwards, while it was not warped as such, it just looked like it needed to be strengthen somewhat.

 A 3mm board was then glued and nailed over the base from the point there the slider rail joined. Weights were needed to keep pressure on the board during the drying process. I only had a few weights that could be used which weren't enough. 

Not having time to mess around I needed more weight right then and there, so, I ended up grabbing whatever I could find that was close by. 

The answer to the problem, while not 'The Norm' ended up working. Amazing what a large plant pot, a wooden box of tools, a jar of water, old metal iron, and a box of laundry powder and a Grunt strap can do when needed! 


Gluing split process


Gluing split process tapped


Unorthodox style of weights


Support boarding added for strength


Removing the Internal Hardware

After the divide, I chose to work on the wardrobe side of the trunk, the drawer side was stored away until later. 

The first job to do was to remove the two timber edgings that supported the sides.  The nails were clinched over very close to the front edge. Wonderful workmanship by the trunk builder, but I must say it concerns me if I am to get nails to clinch into that same position again so they will stay tight enough.

More importantly, will I ever be able to get them to be as tight again like the original?  I will think about that problem later.

Nail before removal
 

Side timber removal.
The two damaged nail hooks had another use


Nail after removal

One of the holes left from a nail after the timber edging
was removed.
All these holes are very close to the metal as well as the top
edge of the trunk 

Next the sliding rail needed to be removed. Four clinched screws were taken out. Again, the angle of these screws concerned me, I thought how is something straight going to go back in at the angle these came out of. Another issue to look at later.

The middle hanging rail was bent. I decided to leave it as is because I feared trying to straighten it may cause the timber to split open. There were already two splits in the sliding rail that need to be looked at. I glued and taped them. 


The slider rail that needs to be removed


Slider rail support


The four clinched screws from the slider support.


A split in the dove tail joint


Splits in the pull out railing glue and tapped
Just in view, the leather tie down holder to be removed, it can be re-used.
Metal tie down clip to be removed, painted black and re-used.
The area showing where a leather strap was cut away from,
new straps to be fitted later


 I never got around to taking a close-up photo of the 2 leather cane/parasol holder before they were removed. However, I am hoping that I will be able to re-use them as well. I Will look at this area later.  


Thursday, 14 September 2017

The Great Divide


25/6/2017 became the day of the 'Great Divide'! To me there was a mixture of feelings, some anxiety surrounding the task that lay ahead, while, at the same time a level of excitement knowing the time was right to make the attempt. 

Daughter number two (as seen in dress up mode in introduction) and soon to turn 30! came to lend a hand and give much needed support. Out came all the tools and my mental plan of how to go about making it happen. 

So, my wardrobe steamer trunk was wheeled out and placed on the 'operating table'! With hammer and nail pulls in hand we started on the bottom hinge plates.


Daughter lending a hand


First nail for my daughter and 'snap' not the handle but one of the forks.... great... Grrrr! A few minutes later, on my first nail, both forks... double great, and double Grrrr's! Obviously cheap knock offs from good old reliable China. 
But hey, the handles still work ha! Thinking caps were put on and a few other tools were tried... no luck.. a good start and still on nail number one!

Yep!

"A chisel", daughter suggested. I was a bit apprehensive, with respect for the chisel which is for timber, not Titanic steel! But hey, desperate measures needed, so sacrifice an older chisel, I will replace with a new later. 

We managed to get in behind the nail head with the chisel and eased out enough length to get pinches in to pull it out, but still couldn't free it. In came my trusty cutter friend and snap... Got ya ! 


That was one down, still have fifteen to go. The steel was 'So' hard to work with, but we ended up getting five out, not bad for a first attempt. The job so far was looking ok...  but can't say the same for the chisel!

The flat black head nails were the hardest to work on.
There was more room to get under the brass ones 
The wonder chisel! and still being used,
but not sure for how long


I continued the next day working on a flat head nail that I had already started, I had lifted the edge on one side, but no way could I get the other side to lift. Continued with the chisel to try and cut through the nail, like a few yesterday did. But no luck with this one!


I found yesterday that some nail heads would snap off when hit, allowing me to get to the stem... but again, not this one! 

I thought I would try my (Fein Multi Master) cutting device and cut it with the metal blade cutter. This did work on the steel to a degree, but I considered it too dangerous as it bounced around way too much, one slip and it would gouge into the body... so not worth the risk. 

Back to the chisel, but, as seen in the photo above the missing chunk was not allowing me to toggle the right spot to snap it. The nail head was so deformed by this stage and there was less head to get a good grip, while at the same time too much stem to punch back inwards.


"Oh, what the heck"!


One beastly nail


This is what clinched rivets look like from the inside


This is what a clicked over nail looks like from the inside


Hearing my plight, in came husband with stronger wrists than me. He tried all the things I did... still, not this one! We left this nail for a while and moved onto another. Also, moved to another chisel, so that's two to replace. Continued to have trouble with these flat head nails.

 "Bring in the drill" he said. I mentioned how I tried that on the drawer pulls and the steel just laughed at the idea! Still we will try it on the divide. It took some doing to start with, but it looked like it was going to work. I think having the metal of the hinge, plus the timber structure of the trunks frame to be able to push into helped big time. A far cry from the 6mm timber structure of a stand alone drawer with no strength behind it.

The routine was: several hits into the metal head with a hole punch, then drilled unto using a bit to fit into the nail head size. Next a larger drill bit was used to countersink the head, this was driven in as far as it could go without hitting the edge of the canvas. Finally, the nail was punched back into the trunk. We were finally on a winner.... yah!

All the nails including the beastly one were taken out using this process. Fantastic effort and finally a divided trunk.

Thanks to Hub's x


Countersink drill out. A process that worked well


Hub's at work


A Milestone Is Made:


 My Wardrobe Steamer Trunk is finally divided

Blowing more whistles, throwing more streamers and of course, a few more drinks.... Cheers!!