Cleaning The Trunks Canvas and Leather Handles
After the internal work was competed I decided to leave the re-lining until later. Although it was Winter when I started working on the trunk, living in the sub-tropics the weather is very mild with sunny days, - this year particularly, there have only been a certain number of cold nights.
Although the trunks canvas has been neglected for so long, I felt the trunk in general was drying out even more from being outside on the deck, because of this I felt that the canvas needed to be done. I put up a shade barrier on a section of the deck which did help, then started planning the cleaning process.
Although the trunks canvas has been neglected for so long, I felt the trunk in general was drying out even more from being outside on the deck, because of this I felt that the canvas needed to be done. I put up a shade barrier on a section of the deck which did help, then started planning the cleaning process.
I started by sponging down sections with warm water and a mild detergent. I noticed the canvas was feeling very sticky which bothered me greatly. Confession time has come. Years, and I mean years ago! I felt the canvas need help and in those days, there wasn't information available like there is today with the internet.
So, I did a little test with shoe polish, this did seem to make an improvement. I ended up coating the trunk with a thin layer of the polish and this definitely helped the overall feel of the trunk. So here I am now in 2017 doing this clean, I really didn't think there would be any impact from the polish after all these years, but looks like there is.
So, I did a little test with shoe polish, this did seem to make an improvement. I ended up coating the trunk with a thin layer of the polish and this definitely helped the overall feel of the trunk. So here I am now in 2017 doing this clean, I really didn't think there would be any impact from the polish after all these years, but looks like there is.
Hmm! Ok I thought, come on deal with this somehow. I ended up dampening the trunk more than a light sponge and did a few scrape tests in different areas and yes, this did lift the residue. So, off I went cleaning and scraping my way around the trunk. I was very gentle in doing so noticing weaker areas, while others could take a bit firmer scrape.
I planned on cleaning the whole trunk down first, but after a couple of days of working on it, again concerns of drying out hit another level because it was also drying from the clean. I had to stop and completely change direction.
I planned on cleaning the whole trunk down first, but after a couple of days of working on it, again concerns of drying out hit another level because it was also drying from the clean. I had to stop and completely change direction.
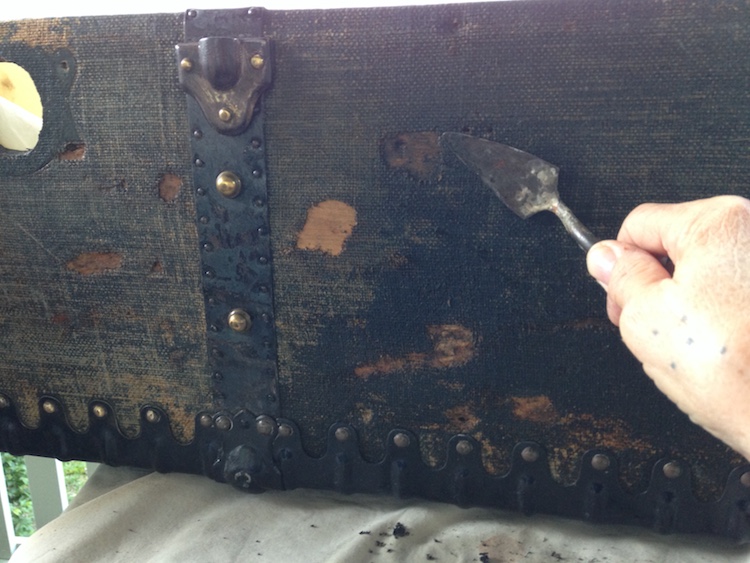 |
| Scraping process. Quite a lot of worn areas in this part of the trunk. The canvas is worn but not rotted, some people would remove all the canvas, but not me, that's how it is that's how it will stay. I love the trunks scars, this is it's history and I often wonder while working on it just how did it get the scars! |
 |
| I worked around the trunk in sections, staining one then scraping the next. After two were stained I then shellacked both. The shellac highlights the timber as well, but shellacking has not been done at the stage of this photo |
A picture below shows one of my scars. When I needed to re glue any canvas back down the trunk I used a water based glue, which was fine for this process. However, when the areas were completely dry, darker marks showed up around the edgings.
I did manage to scrape some of it back before shellacking and there was an improvement, while not perfect. The second scar I left on my trunk were from splitting the canvas to be able to get in and re-glue. once dry the spits left a mark because the canvas shrunk away a little.
Oh well, as with Ned Kelly's famous saying "Such Is Life"!
 |
| Splits in canvas re-glued and tapped |
Next, I gave it two coats of shellac, with a light sand with wet and dry, I wiped it over with a light damp cloth to remove any fine dustings, then another two coats, four in total.
The trunk felt and looked great, it was like a new lease of life had been put into it.
I was really pleased, so much so that I gave it a little hug!
 |
| Base all complete, the scaring from splitting the canvas can be seen in this shot... Ah well, its another part of the trunks journey! |
Years ago, while not rusted, the castors above did freeze up. It took some time working them loose, but we managed it. When I got to the base of the trunk I was amazed to see that they were still rolling.
An extra spray was given. I originally used WD40, but heard that Lanolin based spray worked better on in certain situations, so I decided to try it. They are now good to go for more years to come.
 |
| I thought I would just take this moment to add this photo of the near completed external section. To avoid getting lost in the progress of the shellacking process I left ticked indicators as to whether one of two or two were coated. It is easy to get confused as to where I was with so many sections, not only that, in the end I coated the trunk with four layers of shellac so the tick process definitely helped |
I was determined to try and keep the original three leather handles my trunk. The handle on the side did have the leather separating in a few layers, managed to re-glue them together.
This process probably isn't the right way of going about it, but I did it anyway. The same process was done for the handle on the top. From memory, the third handle (on the other section) should be much the same, this one will be viewed later when I get to it.
 |
| Handle before |
 |
| Handle re-glued and strapped |
 |
| Handle completed and saved |
No comments:
Post a Comment